Sunday, January 27, 2013

Chevron Burlap Valentine's Day Wreath

With all of the fantastic wreath's on Pinterest, it is impossible not to feel the itch to make a few new wreaths!

I found this great chevron burlap ribbon at Hobby Lobby this fall, and when I went back to get it, it was all gone at the three stores I can easily drive to, and on back-order   I got a call a few weeks ago that it is finally back in stock!  I wanted to use it in a new Christmas garland, but Valentine's Day is the next best thing, right?


I helped some friends make one of these wreaths for Halloween and I love the look of the rosettes.  She links to a great tutorial on how to make the them. I know we made at least 300 of these felt rosettes all together.

Easy & Pretty Felt Flower #Halloween #Wreath Craft.


When I made my Valentine's Day wreath I knew my finger tips couldn't endure 300 rosettes worth of hot glue burns, so I settled for a smaller heart shape covered in the rosettes.

After searching through all of the great burlap wreaths on Pinterest, I liked the look of this one the best, how can you resist the poof?


She has a great tutorial on how to make this wreath, with great pictures.  She used 12 yards of the burlap ribbon, and I used 3 rolls, which I think is 30 yards.  I love the poof...

Here is my combination of these two wreaths:


 I made the heart base out of cardboard, punching two hols and stringing a piece of floral wire through the holes before I glued on the rosettes so that I would have an easy way to attach the heart to the wreath.  I might want to switch out the heart and use the burlap wreath as a base for different holidays.

I used some of the leftover felt to make the little flags for the LOVE letters.  I cut out the letters with a black shadow on my Cricut, with the Doodletype cartridge.  I glued those onto the flags, and glued the flags onto red and white bakers twine.  Then I tied the twine to the metal wreath form.

Happy Valentine's Day!


Photobucket

Sharing with:
DIY Showoff - DIY Party

Sunday, January 22, 2012

Family Tree Artwork

I saw this fancy family tree (The Giving Tree Family Tree) in Martha Stewart Living about a year ago and thought how nice it would be to have some family history as artwork around the house.  Art is so much more enjoyable when it is personal or has a special meaning, don't you think?


I have always been interested in genealogy, and thought this would be a creative way to go about it!  I was even more inspired after seeing a few episodes of "Who Do You Think You Are?".  Did y'all watch that show?  I love that Brooke Shields descended from royalty!  The sponsor of the show was ancestry.com, which is such an amazing site.  You can enter your family information, and things will pop up that may be links to your tree.  You can view the actual census documents from the 1800s!  And manifestos from ships full of people immigrating to America.

1850 Census Report for Louisa May Alcott:


The Unsinkable Molly Brown from the Titanic's Passport Application:


Ok - so after I researched our tree, which took a while, and some digging, (If you are a Rathgeb, German by way of Switzerland - please email me!!) I was ready to make the tree.  Martha provides the templates and makes things sound like they will be so easy, and the products so readily available!  It is not so Martha! 
Here is the list of tools and materials Martha calls for:

Problem #1 - Ace Art Supply has never heard of 30-by-40-inch watercolor paper.  Hobby Lobby and Michael's don't have anything that size either.  But I did find a smaller size watercolor paper at HL that I thought might work.  I had it printed out on drafting paper at an office supply store to make sure it would work on the watercolor paper I found, and it would! 

Problem #2 - No one can print on large paper unless it is on a roll.  What!?  After all that, and now no one can do it!?  Minuteman Press to the rescue!  They have beautiful watercolor paper on a roll!  Brian at MP helped me out and I had my tree the next day!  I highly recommend them.


Next up - the templates for the name tags.  Now, if you work for Martha, or you ARE Martha, you probably have exemplary penmanship that you don't mind to display from now until the end of time under museum quality glass - but I do not.  In Photoshop, I layered text over Martha's template and used a great handwriting font from Kevin and Amanda (if you haven't heard of them, they have amazing fonts! And lots of other neat creative stuff on their site).  I used the font "Pea Nic Script" for my tree. 

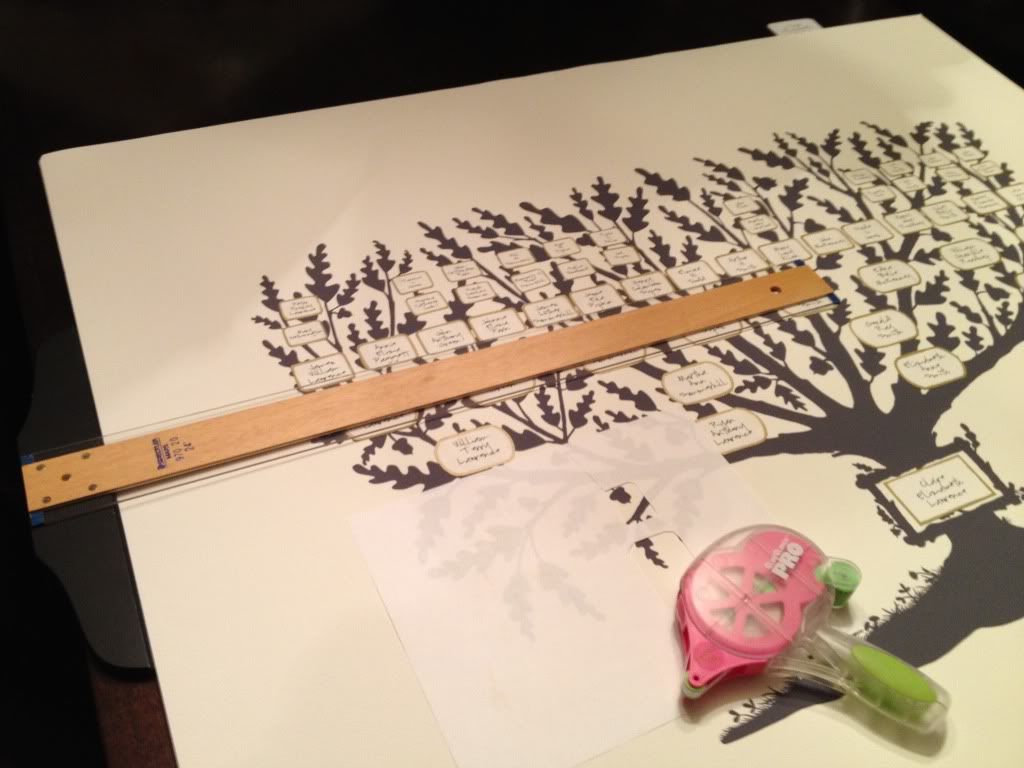
Then I used the sheet of watercolor paper I bought and could not use for the tree, cut it up into 8.5" x 11" pieces and printed out the template tags.  I cut out the tags (with scissors instead of a craft knife) and traced around the edge with a gold paint pen (instead of a paint brush).  I made the tag with Claire's name at the base of the tree a bit larger than the others.  And I made the older generations a little smaller so I could fit more on the tree. 


I think I had the tags laid out for 2 months before I had the time and the nerve to glue them down.  I used my T-square to line things up and my scrapbook adhesive gun to glue them down.


Now how do I frame this beast!?  I did consider that before I had it printed.  I had in mind to fill a large blank wall in the powder room, so I wanted it to be sizable.  Because of the proportions of the tree, I knew that I would have to custom frame.  Any ready made frame would not have an even mat on all sides.  My first trip to Michael's for framing resulted in about a $300-$350 framing job - what!?

My high-end selections:


That was not going to fly.... back to the drawing board...

My next trip to Michael's, with a budget in hand and with the help of my friend Kathy's (who just happens to be a Michael's framer, an excellent framer at that!) artistic eye, I settled on these two choices:


And picked the top one!

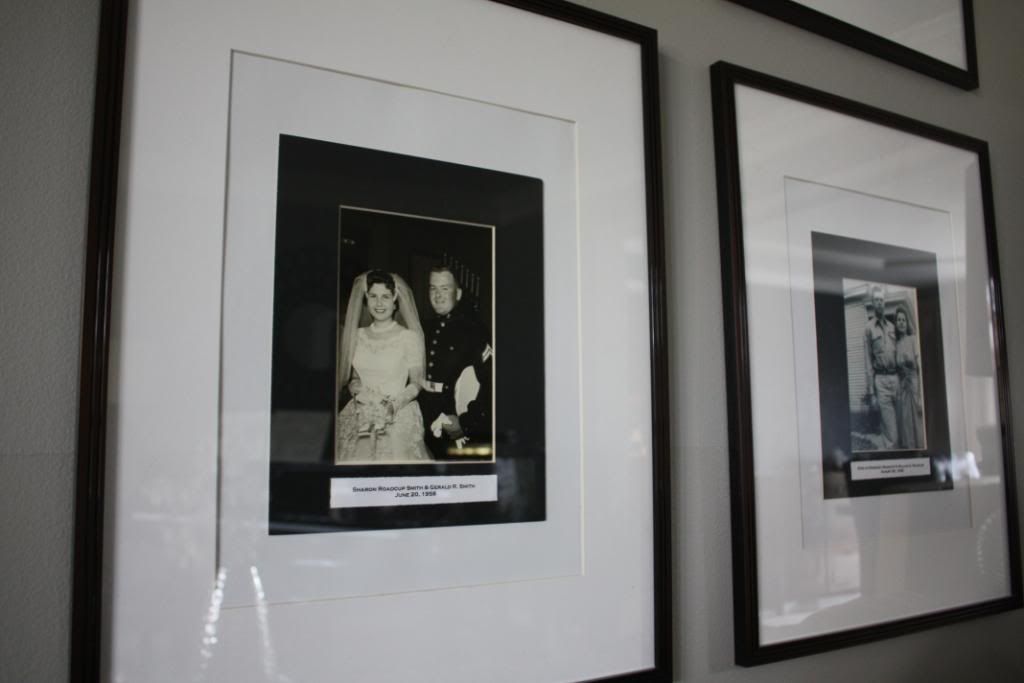
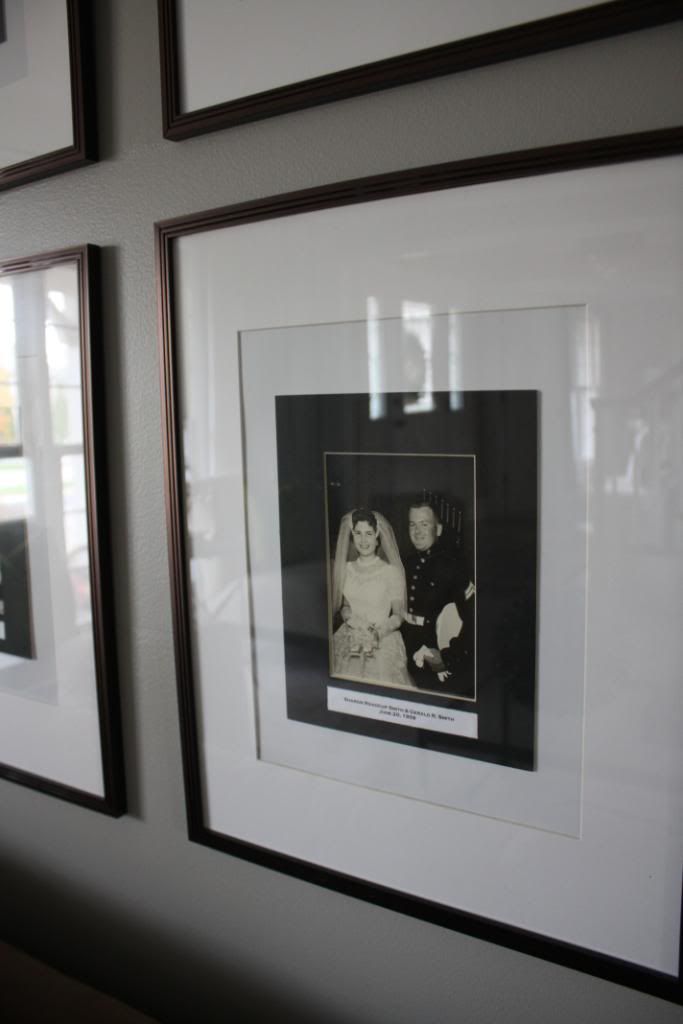
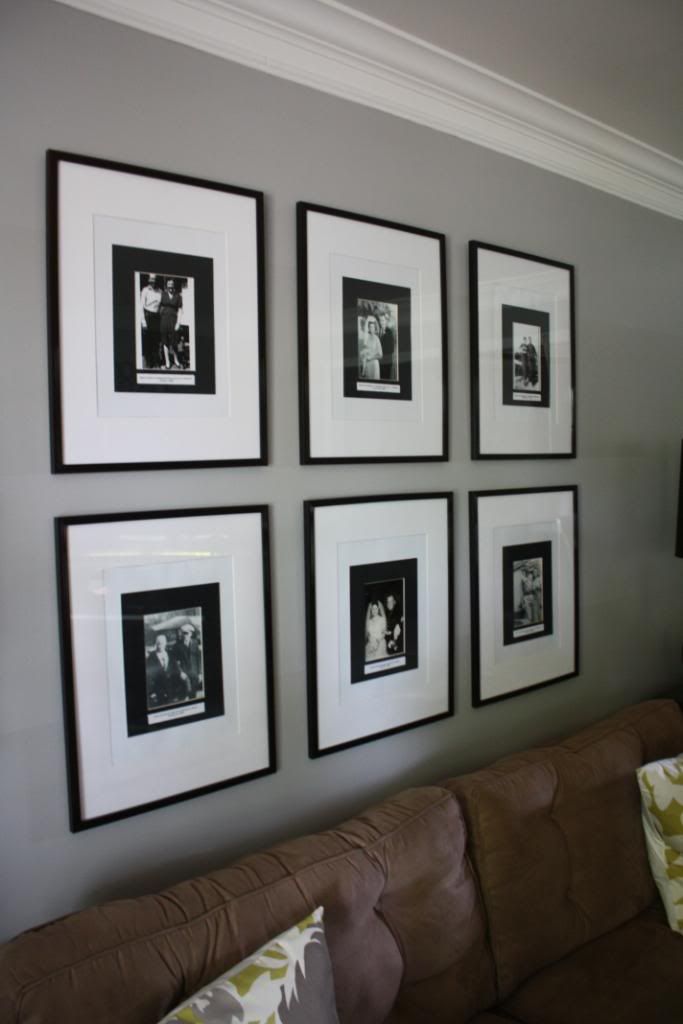
After a long wait behind all of the Christmas presents being framed, I finally got the finished product!  And here it is... almost too pretty to put in a bathroom. 


Have you done any family tree projects or ancestral art? 


Photobucket


Linking to:
The DIY Project Parade at The DIY Showoff
Savvy HomeMade Monday at Home Savvy A to Z
Weekend Warrior Link Party at Ask Anna Moseley
Metamorphosis Monday at Between Naps on the Porch
Made By You Monday at Skip to My Lou
Tuesdays at Shwin & Shwin
Tuesday Treasures at My Uncommon Slice of Suburbia

Sunday, January 15, 2012

A January Pool Party!!!

I feel like I have been buried under Christmas, family visits and a special little girl's birthday, and now I am finished!!!  And I can show you all I have been working on!

First up is the birthday.  Claire requested a swim party - which might not be your first thought in Chicago's January weather.  Bear Paddle Swim to the rescue!  So much fun, and really warm water!


Could this little swim princess have just a plain ol' swim party theme - of course not!  She chose mermaids!

Here is the mermaid cake she chose that I labored over for about 3 days....


I have been trying to perfect my fondant for years, but after watching a great You Tube video, I had the most successful attempt thus far! 


Oyster Cookies with a little pearl inside...


Goldfish marshmallow pops...


And we made clothespin mermaid dolls...

(Thanks JV for loaning out your Playmobil boat and beach!)

Here is the cutie pie in front of her dessert table...

(Please note the ruffled crepe paper backdrop that my mother spent hours and hours on, sewing ruffles into yards and yards of crepe paper - thank you Mom, love you!!)

It always amazes me to look at her on her birthday and remember what a miracle she is, born at 2 lbs, 5 oz.  She is truly a gift from God.


Photobucket


Linking to:
Sister Sunday at Sisters of the Wild West

Sunday, December 25, 2011

Merry Merry Christmas!

Wishing you and yours a wonderful holiday filled with love and laughter!


Photobucket

Monday, November 21, 2011

I am a Guest Blogger Today...

At A Lived In Home!

A Lived in Home


How exciting that Megan asked me to be a guest blogger and share our Living Room transformation.  Please hop on over to check it out.  And check out her great blog while you are there, who wouldn't love to sit for a spell and have a dinner party here?


I love those dining chairs! 


And I am in love with this table in her Living Room:


I think it would be perfect in my Living Room too!

Thanks Megan for having me!!!

Photobucket

Wednesday, November 16, 2011

Foyer Updates and Additions... and a Survey!

#1 - The Mirror:

When I bought the mirrors to go over the foyer table they weren't exactly what I wanted - but just after the return period expired (of course), I found the perfect mirrors!  So I had to get them, and I must admit that I really like them so much better!

Before:


After:


What do you think? Better After?  Would you believe that the new mirrors were only 1/2 the price of the first ones?


#2 - The Lighting:

When we were working on the foyer I purchased one chandelier for the light closest to the front door.


We have a low ceiling, so no beautiful dramatic welcoming foyer for me!  I wanted to turn the second light (another fantastic boob light) in the entry hallway into a recessed can, so you got the light, but it didn't interfere with the chandelier.


One year later...skip to - still no recessed can.  So I thought I should get a second chandelier while Overstock still has it! 

After about an hour of grumpy grunting, and some drywall modification, I have a second chandelier!


It is a bit more dramatic, and I think I like it.  I better like it - I was told that it isn't coming down (after all that grumpy groaning...)
What do you think? Better After?


#3 - The Rug:

Here is my same 'ol same 'ol rug from Steinmart that I have used in every home.  I think I need a more modern change.  But, this rug is just about the perfect size, somewhere in between a 4' x 6' and a 5' x 7'.  It has black and gold tones.


But...I REALLY want a chevron rug in there!  I bought one a while back but it was cheap and had rounded corners - yuck!

I found two on overstock.com. 

I think I am leaning towards this one, but it is a little smaller than the other choice, 4ft x 5ft 7in.  I like the cleaner white color with what I have going on in the two rooms right off the entry - the Guest Room and the Living Room.


This one is a little larger, a 4ft x 6ft.  This one also has a more earthly cream color mixed with the black - which would show less wear and dirt.  But I don't know how I feel about the earthiness....maybe not clean and crisp enough??


I am going to try this new twist on your opinion, with a survey!  Let me know what you think!


Photobucket


Linking to:
Wow Us Wednesdays at Savy Southern Style
Open House Party at No Minimalist Here
Transformation Thursday at The Shabby Creek Cottage
French Cupboard
Inspiration Friday At The Picket Fence
Fridays Unfolded at Stuff and Nonsense

Sunday, November 13, 2011

Living Room Gallery Wall...

I received a lot of questions about the black and white pictures and the frames over the Living Room sofa.  They have a special meaning to us.  They are photographs of our parents and grandparents - a wedding photo if they had one. 

They were displayed at our wedding 10 years ago:


They lined the stairs in our first home:


 (Wow, this stairwell looks a bit ominous - I would like to think my photographic skills have improved since then...)

(This was a sweet little first house.  And you can see our little Boston, Rosie on the front walkway.)

Since then the pictures have been hidden in a drawer for 9 years!   

In the clean-up for our last move, I took the pictures and their mats out and tossed the original silver frames.  When I got them out to try over the couch, I used these thin metal look frames from Jo-Ann's.  The frames are oversized for the black mats, so I used glue dots to adhere the black mats in the middle of the new frames.  I turned over the advertising frame insert to give the black mats a plain white background.


(These are my parents, married at 15 and 19, for over 50 years!)

The frames are sized 17" x 21", with a mat opening sized 10" x 13".  They come in Bronze, Pewter, Copper and I think Black.  They are the LA frame series.

Ryan loves it when I ask him to hang complex series of frames in a very specific way that have to all be even and exact.  Love that guy, but he doesn't have a great track record of hanging things straight the first time.  This go-round he came up with a clever little trick.


I laid out the frames just how I wanted them spaced on top of a piece of masking tape on the floor.  He marked the tape with the correct spacing and then stuck it on the wall using our trusty laser level, then nailed right through it.


Then he used the same piece of tape, just moved it up the wall and nailed through it again.


And voila!  Done the first time!


Photobucket


Linking to:

The DIY Showoff - DIY Project Parade
I Heart Naptime - Sundae Scoop